Build a Nintendo emulator using a Raspberry Pi 2
Today we'll build an extremely portable retro gaming console that emulates some classic consoles including Nintendo Entertainment System (NES), SNES, Sega MegaDrive and others.
We will be using a Raspberry Pi 2 and the RetroPie software.
Requirements
- Raspberry Pi 2
- Raspberry Pi 2 case
- Micro SD Card (8Gb+ recommended)
- USB controller (we’re using the excellent NES30 controller)
- USB keyboard
- FTP client
- Ethernet cable (local network access only)
- HDMI cable and TV/Monitor
Step-by-Step Guide (OS X)
Getting the software
Start by downloading the latest build of RetroPie from PetRockBlock.com. We'll save it to a ~/Downloads/RetroPie directory on our MacBook Pro.
The latest stable release is v2.6 but we’ll be installing RetroPie 3.0 Beta 2. Make sure that you download the correct build depending on whether you're using a Raspberry Pi 1 or 2.
The Raspberry Pi 2 is highly recommended for the extra CPU power which comes in handy to get emulation without lag and is a requirement for some of the more demanding consoles such as N64.
The RetroPie distributable is usually compressed so unpack the archive to a .img file after the download is complete.
Installing RetroPie
If you aren't keen to use the command-line on OS X or perhaps use Windows instead there are some programs that can help with the progress.
For Windows use Win32 Disk Imager
For OS X use PiWriter
Insert the Micro SD Card into your Mac and open up your Terminal program (I use iTerm2 but OS X comes with a built-in Terminal).
We need to start off by finding the device node of the Micro SD Card. Use a built-in command-line utility called diskutil to get a list of all current disks attached to your machine.
From the open Terminal window run:
diskutil list
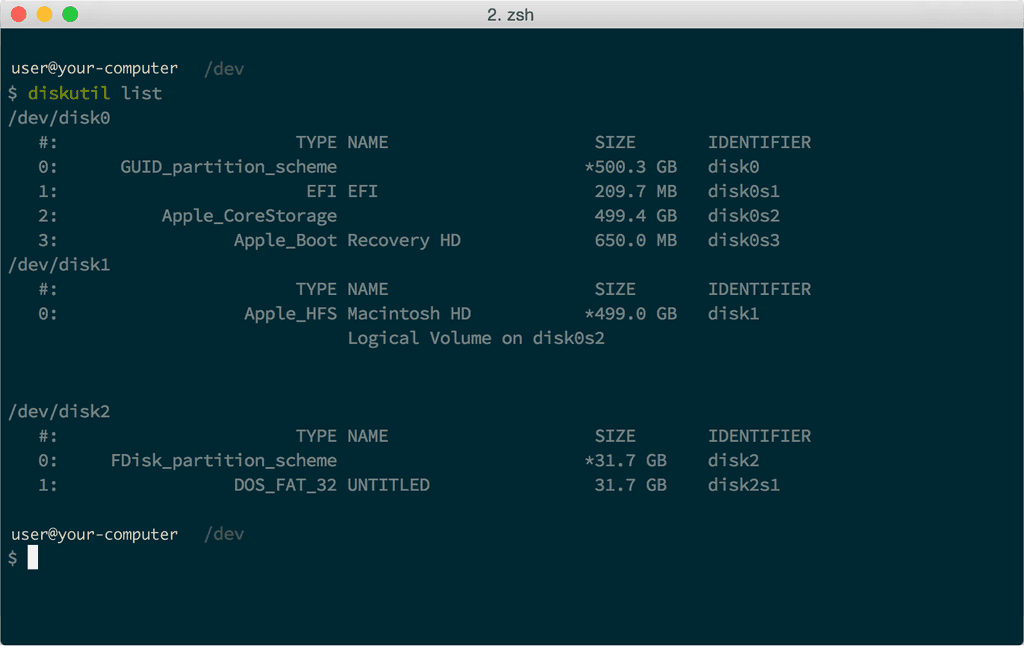
You’re looking for the entry that matches your Micro SD Card. In the screenshot we can see our SD Card is at /dev/disk2. Make note of the device node and be very sure you have the correct one.
Now that we have the device node, we need to unmount the SD Card by running:
diskutil unmountdisk disk2Replace disk2 above with your own device node leaving off the /dev/ prefix.
Still in the terminal, navigate to the directory to which you previously saved the RetroPie img file.
cd ~/Downloads/RetroPieNext we’ll use a command to load the RetroPie image onto the Micro SD Card.
sudo dd if=retropie-v3.0beta2-rpi2.img of=/dev/rdisk2 bs=1m- if = Input File
- of = Output File
- bs = Block Size
- Make sure to replace retropie-v3.0beta-rpi2.img with the actual name of the img file you previously uncompressed.
Note that we use /dev/rdisk2 instead of /dev/disk2. Specifying rdisk writes directly to the disk and skips the write to buffer which speeds up the entire copying process.
It’s important you specify the correct output location or you may overwrite data on your primary hard drive and you really don't want to make that mistake!
When you hit Enter the copy process will start running but it won’t show any output to the terminal window. It can take anywhere between 5 and 20 minutes to complete so be patient.
If you’re concerned the process is taking too long, you can hit Ctrl-T to get the current latest transfer data output to screen. You can do this as often as you want until the image copy is complete.
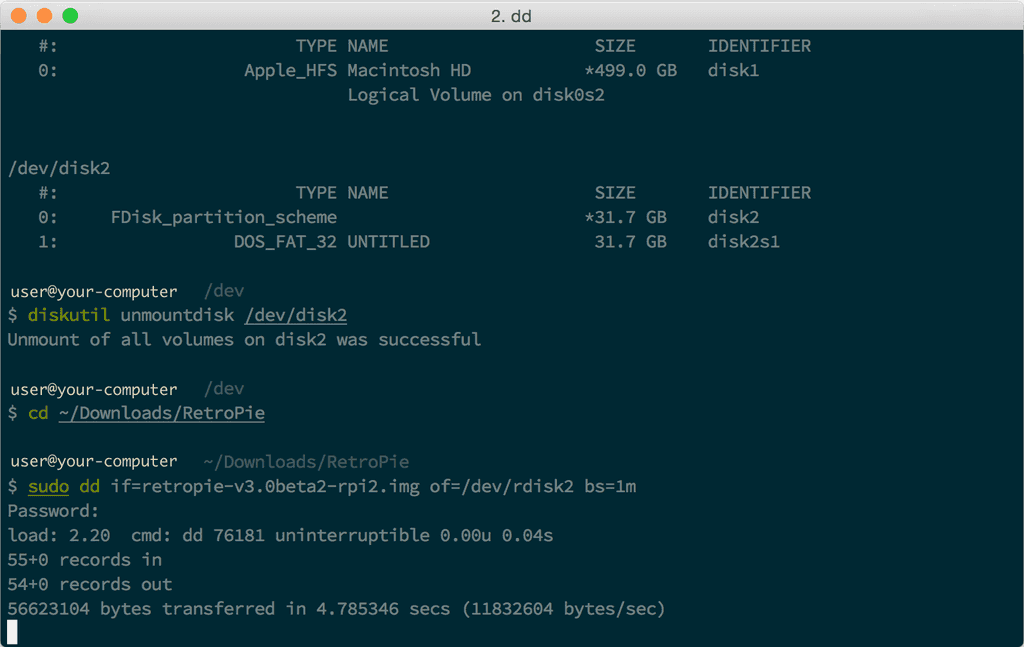
Once it’s complete verify the install by running diskutil list again. Under /dev/disk2 you should now see the installation of a boot partition as well as a Linux partition sized at approximately 3.5Gb. Don't be too alarmed at the 3.5Gb size as by default it won’t have used the entirety of the SD Card’s available space - this is something we’ll correct once we’ve booted up the Raspberry Pi.
Setup the Raspberry Pi Hardware
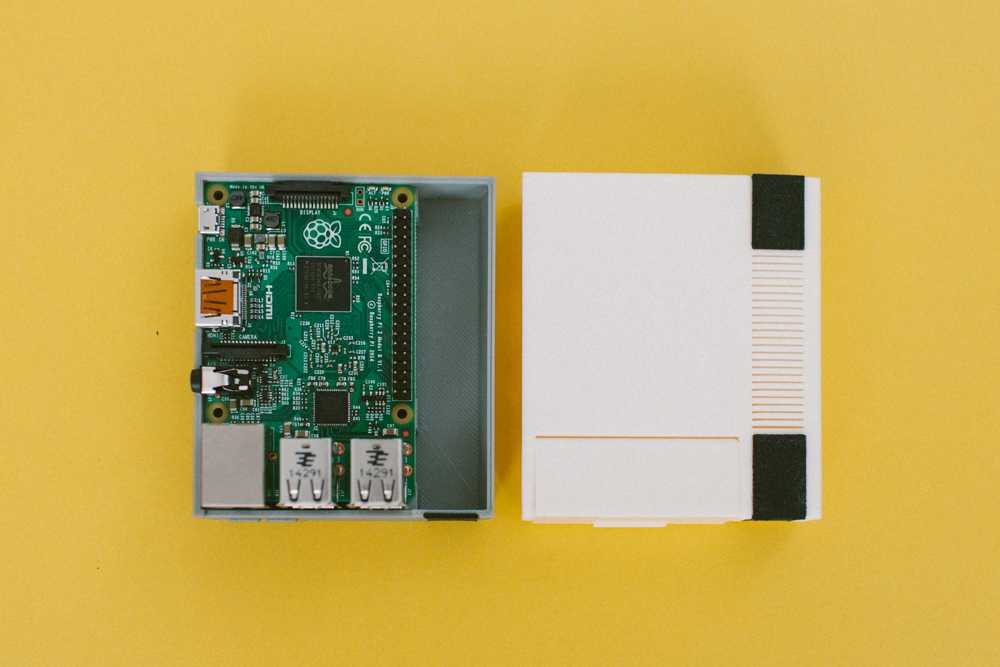 We are now ready to setup the Raspberry Pi itself.
If you haven't already, install the Raspberry Pi 2 into a case and plug in the keyboard, USB Controller, network cable and Micro SD Card. Plug it into your TV/monitor via HDMI and turn it on.
You will be greeted with a Welcome screen and it should show ==1 Gamepad Detected==. At this point, it will ask you to “Hold a button on your device to configure it”. This process sets up the controller to allow you to navigate the menus of the RetroPie UI. We'll still need to setup the controller to be recognised within the emulators themselves (but more on that later).
First-time configuration
Once the system has booted and you're inside the GUI, select ==RetroPie== from the main menu (you may need to hit right on the controller a few times).
Select ==Raspberry Pi Configuration Tool Raspi-Config== from the list of options. At this point it will boot the Raspberry Pi Config utility.
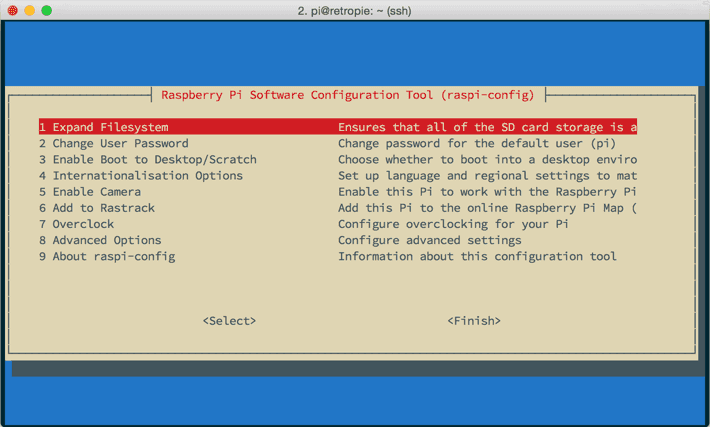
First, select ==Overclock== - you will need to use your keyboard at this config menu. You will see a message that overclocking may reduce the life of your Raspberry Pi. You may ignore this as we're just ensuring we've selected the correct high clock speed to take advantage of all the new and more powerful Raspberry Pi 2 offers.
On the 'Choose overclock preset' screen select ==Pi2== and press Enter. You will now be back at the main Raspberry Pi Config menu
Second, select ==Expand Filesystem== to kick off the process to use all of the space on your Micro SD Card. By default it will only use the first 4Gb of space. We're using a 32Gb card so we'll definitely want to expand the filesystem to take full advantage of all of that space.
Once the expansion has compelted, select ==Finish== from the bottom of the Raspberry Pi Config screen. You will be asked if you wish to Reboot - select Yes.
Setup the USB Controllers
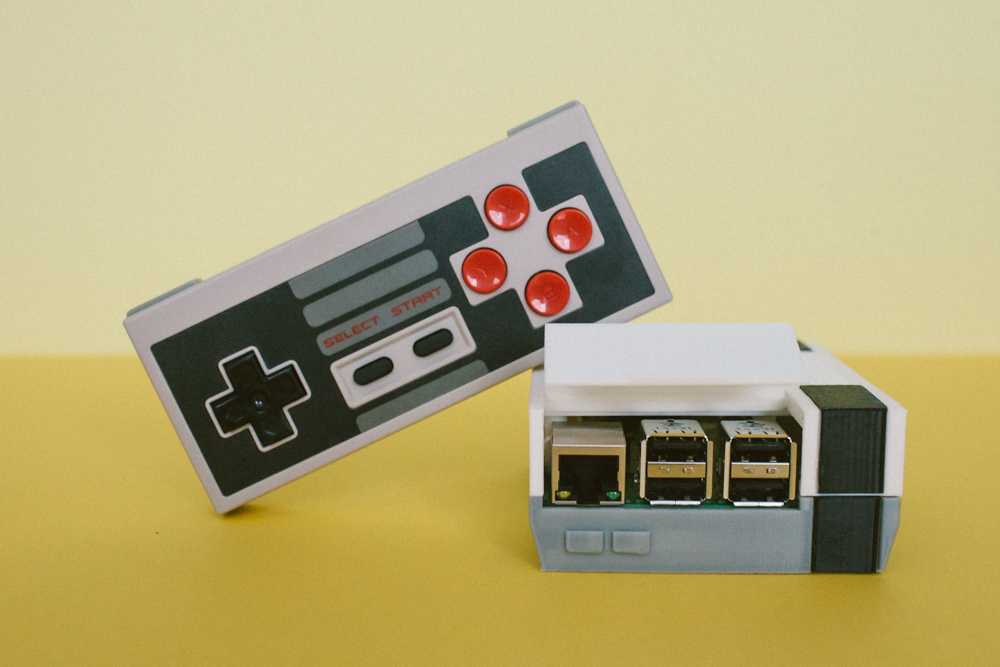 Earlier when you booted up the RetroPie for the first time it detected a controller and asked you to setup the inputs.
This setup was to enable the controller for navigating the RetroPie's UI. We will now go through the process of ensuring our controllers are properly recognised for use within the Emulators themselves.
We have a NES30 Controller which is styled like the old NES controller but has the same number of buttons as the SNES controller (including two shoulder buttons).
As before, select ==RetroPie== from the UI after booting up but this time select ==Configure RetroArch Keyboard/Joystick==. You will need the keyboard again at this point so use to to select ==Configure controller for use with RetroArch==.
This will boot a setup script asking you to press the corresponding button shown on the screen. You have to be quite quick as the delay to press a button isn't very long. If you make a mistake you can just re-run the setup script.
Note: Your controller might not have all of the inputs - for example our NES30 does not have any analog sticks. You can safely ignore and wait until the script reaches completion.
Once you have completed the setup for the connected controller you will find yourelf back at the RetroPie UI.
Repeat the above process for any new controller you may want to use on the RetroPie in the future. We used a NES30 controller since our interest was in NES and SNES games but you can plug a PS4 controller into the console and use that too if you plan to play games requiring analog sticks.
Transfer some ROMs
Time to transfer some games across!
First off get the IP address of your RetroPie by loading up Terminal and pinging it with the following command:
ping retropieLoad your favourite FTP client (I use Transmit but feel free to use any others such as CyberDuck).
Connect via SFTP to the Raspberry Pi’s IP address using the username pi and password raspberry. This will connect you to the /home/RetroPie directory.
All ROMs go into the /home/RetroPie/roms directory under the relevant emulator’s directory.
In earlier versions, RetroPie sometimes has multiple emulators for the same device but the ROMs directory has been tidied up in 3.x
We'll be uploading the excellent Super Mario Bros to the /home/RetroPie/roms/nes directory to get ready to stomp some Goombas.
Once you've completed and uploaded all of your games onto the Raspberry Pi, you will need to reboot.
Reboot the RetroPie by pressing Start on your controller and selecting Quit -> Restart System. When the RetroPie starts back up you should find an entry in the menu for all of the consoles for which you have uploaded ROMs.
Best NES Settings
We have found the following to be the best settings when running NES games to reduce input lag as much as possible.
Now open a Terminal window and ssh into your RetroPie by running:
ssh pi@retropieOnce connected you will need to edit the NES retroarch.cfg file located at /opt/retropie/configs/nes/retroarch.cfg
Replace the contents of that file with the following configuration:
#include "/opt/retropie/configs/all/retroarch.cfg"
# All settings made here will override the global settings for the current emulator core
input_remapping_directory = /opt/retropie/configs/nes/
video_shader = /opt/retropie/emulators/retroarch/shader/phosphor.glslp
video_shader_enable = false
video_smooth = false

video_vsync = true
video_hard_sync = false
video_hard_sync_frames = 0
# video_frame_delay = 0
# video_black_frame_insertion = false
video_threaded = false
video_scale_integer = false
video_crop_overscan = false
If you're keen to experiment you can find the full list of configration options in /opt/retropie/configs/all/retroarch.cfg
Lastly (and you'll need the USB keyboard plugged in for this bit), switch back to your RetroPie itself and start up your favourite NES title (Super Mario, right?). Press x before the game boots to get to the emulator config menu. Inside here we found the best settings for NES emulation was to use ==lr-fceumm== as the emulator using a video mode of ==CEA-1== (640x480 without any enhancements).
The good news is that all of the above will only need to be done once and will be active permanently.
Do you have better configuration options to get the emulation as close to the real NES as possible? Please leave recommendations in the comments below.
Some handy tips
- IMPORTANT TIP: Make sure you are using the correct power output on the Micro USB (5V/2.1A) otherwise the Raspberry Pi 2 won't get enough to take advantage of all that extra power. When I accidentally used a 5V/1A Star Fox on SNES ran at horrendous speeds but using the correct power was 100% speed emulation.
- As already stated, press
xon a plugged in keyboard when starting a game to get to a special menu. You can use this to tweak the resolution and visual effects to optimise the emulator's settings to get the best performance. - When inside a game, press
Start + Selectto quit back to the main RetroPie menu. - To safely turn off your RetroPie, press
starton the main RetroPie menu to Quit -> Shutdown System when you're done playing.
The final NES emulator
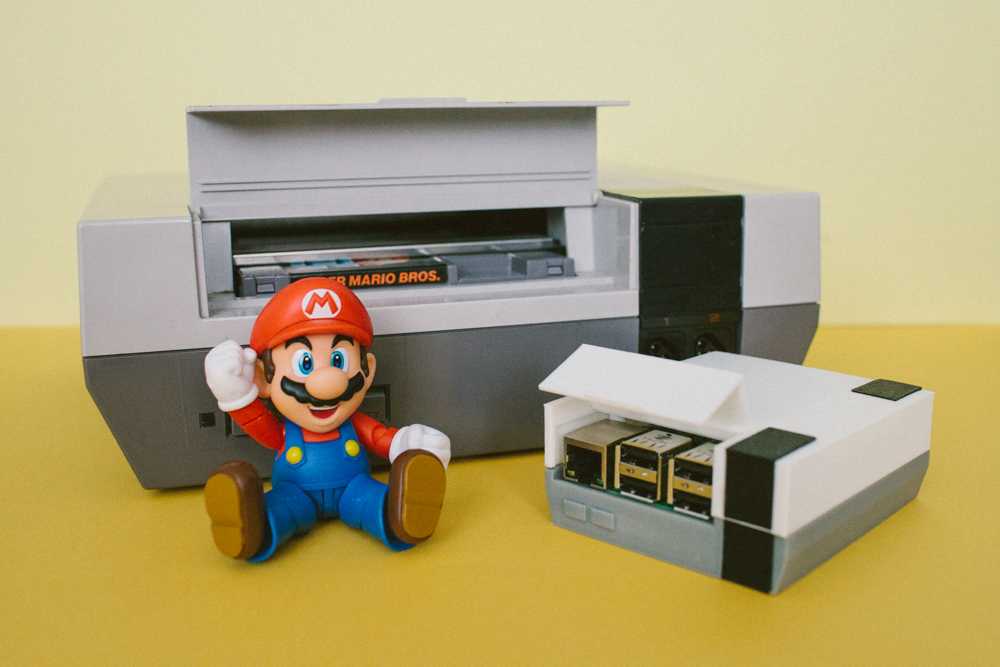
You should now have a fully working mini console to play all the games you loved as a kid. We've only loaded up games we already own the cartridges to with Super Mario Bros and Zelda taking the top Must Play Again spot.
Unplug that clunky USB keyboard as only the controller is required from this point onwards.
Happy Gaming!
