How to switch to Firefox on desktop for improved privacy
Google's Chrome is everywhere these days. In the spirit of healthy competition and fuelled by a desire to greatly enhance my privacy while browsing the web, I recently migrated to Mozilla's Firefox on both desktop and Android.
This guide covers some tips and tricks you can use to enhance your own privacy and make the jump to Firefox on Windows, MacOS or Linux a breeze. I also have a post that you can read if you're interested in ways to use Firefox to vastly improve your Android experience.

What to install on desktop
Start by installing your preference of either normal Firefox or the superb Developer Edition.
I personally use standard Firefox as my day to day default browser but rely on the Developer Edition when building web apps. The Developer Edition is a few versions ahead of the standard build and includes a few helpful developer settings such as remote debugging turned on by default.
Nothing in this article depends on a specific edition so you are free to choose the one that best meets your needs.
Create a Firefox account
A Firefox account gives you the ability to sync your Firefox settings, bookmarks & extensions. It also enables sending tabs between desktop and mobile.
To create one simply open Firefox and head to the Preferences and then the Sync section.

Import data from another browser
You may wish to import bookmarks or other data over from another browser.
Click on File and then the perfectly named Import from Another Browser option. You will be shown a window with a list of browsers on your device and then asked the type of data you wish to import into Firefox.
I keep my browsers pretty lightweight and instead save my bookmarks in Raindrop.io but your requirements may be different.
Recommended Extensions
HTTPS Everywhere ensures that you browse the web using encryption whenever possible. Even if you type a URL with http this extension will ensure you automatically connect via https instead.
uBlock Origin and Privacy Badger perform similar but complimentary roles in enhancing your privacy across the web.
uBlock Origin is an excellent ad blocker that also works to block trackers using verbose lists of known offenders that are regularly updated. Privacy Badger takes a different stance and learns to block trackers over time. If it finds the same tracker cookies across 3 sites it will automatically start blocking those. Privacy Badger also sends the Do Not Track signal and protects against click tracking on Facebook, Google and Twitter links.
It is for these reasons I recommend using both in tandem to ensure you get the absolute best protection without needing to dive too deep into the weeds of finetuning blockers by hand.
Firefox Multi-Account Containers allows you to create special self-contained tabs within the single Firefox instance. It could, for example, be used to create both a Personal and a Work container allowing you to only need one instance of Firefox open and be logged into your work Google account in the Work container and your personal Google account in the Personal container. No more alt-tabbing between browser windows!
The last section of this article explains in detail how to use it to keep our Google account completely segregated from our day to day browsing. If you use Facebook, I recommend replicating it with a dedicated Facebook container to keep their creepy hands off of your data. Or better yet, just delete Facebook.
Firefox settings
Ensure Firefox is a Fully Colour Managed browser
This isn't a privacy setting, but if you're switching to Firefox on a wide gamut display such as found on MacBooks, then I recommend checking your colour management settings.
As of Firefox 77 (the current Nightly version) the default setting for color management within the browser has been changed to be fully managed. If you are using a version prior to 77 or wish to check if it is set correctly then follow my blog post about Colour Management in Firefox.
Turn on DNS over HTTPS
I recommend turning on DNS over HTTPS which is only set by default for users in the United States.
Start by opening the Preferences and scroll down to the bottom of the General section. You should see a Network Settings area - click on the Settings... button to open up a panel.
At the very bottom you will find a checkbox Enable DNS over HTTPS which you should tick and then click OK to save the changes.
You can customise which provider to use but I trust the default (Cloudflare) and leave that set as is.
If you want to know more about DNS over HTTPS and the benefits it can provide you can read the Mozilla blog article or Lin Clark's Cartoon Intro to DNS over HTTPS
Block all third-party Cookies
Firefox - like most of the popular browsers - does not block all third-party cookies by default. Mozilla takes privacy seriously and Firefox has great defaults which will try protect you from a large swathe of tracking and social media cookies.
Open Preferences and head to the Privacy & Security section. You should see the current Tracking Protection set to Standard.
Standard and Strict both block:
- Social media trackers
- Cross-site tracking cookies
- Cryptominers
- Fingerprinters
Furthermore, Standard blocks Tracking Content in Private Windows while Strict blocks in all windows.
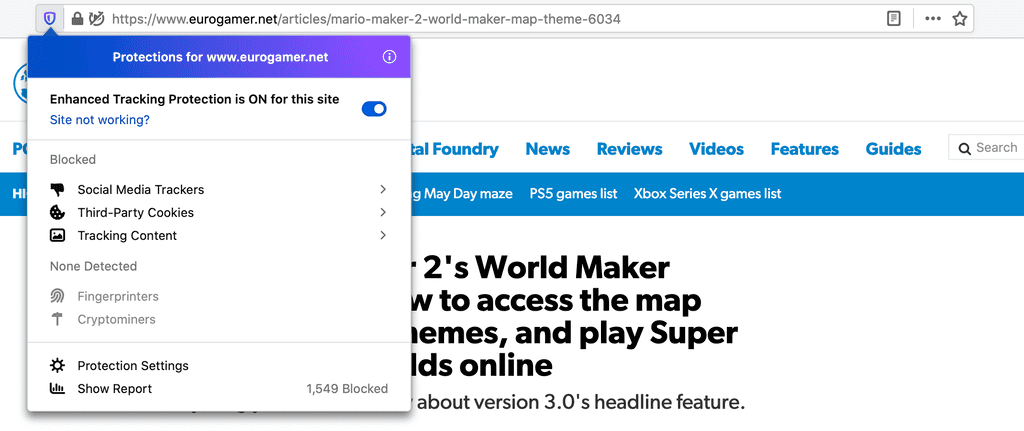
When you visit a site in Firefox you will see a little shield icon in the toolbar. If you click on it that will show you what the Enhanced Tracking Protection is blocking on that particular site letting you dig into the details.

If you're curious, you can read more on what each of these enhanced protection options block on the Mozilla blog.
Selecting either Standard or Strict is perfectly fine - especially when coupled with Privacy Badger and uBlock Origin. But I wanted to try take things a bit further by blocking all third-party cookies instead of just cross-site tracking and social media trackers.
To do this we have to use Custom settings. Ensure everything is ticked, Tracking Content is set to All Windows and set Cookies to be In all third-party cookies.
![]()
Be advised that restricting third-party cookies may cause issues on some sites. For example, I had to whitelist codesandbox.io and csb.app to ensure embedded code snippets were still viewable when browsing certain sites but your mileage may vary. You can whitelist sites under Security & Privacy in the Cookies and Site Data section by clicking on Manage Permissions and adding any domains as required.
If you find the settings aren't working for you then don't be afraid to change it back to Strict or Standard. Firefox will still give you some tracking protection regardless of the option you set.
Set Firefox as your default browser
Now that you have everything setup and ready to go its time to make Firefox your default browser. You will find a handy Make Default... button at the top of the General panel in the Preferences.
Keeping our Google Account seperate
The Firefox Multi-Account Containers extension lets you keep parts of your online life separated into colour-coded tabs that preserve your privacy. Cookies are separated by container, allowing you to use the web with multiple identities or accounts simultaneously.
Lets be honest, Google Search has some of the best results out there - I still miss you, Alta Vista! They have also created some truly amazing web apps that have enhanced our lives. Can you imagine still travelling with a paper map thanks to Google Maps? Gmail provides both a slick interface and untouchable spam protection. The convenience of a trip automatically created in Google Travel based on flight and hotel bookings is a delight. I am willing to accept a balance in the ways my personal data is used and it would be naive to assume we could still surf the web in a purely anonymous way while taking advantage of these conveniences.
That doesn't mean I want all of my searches and history to be associated with my Google account for them to use to continue building an ad-targeting profile about myself.
Chrome is an absolute beast at collecting data about you and adding it to your Google account. Take this moment to view your own activity logged against your Google Account. By default it will log every single Google search you perform and every single website you visit.
You can stop Google searches being logged by pausing your Web & App Activity settings against your Google Account. Furthermore, inside Chrome change your Sync Settings and turn off any items you don't want to sync such as History.
That's all fine but we're busy switching browsers here! And thankfully switching to a browser other than Chrome allows you to be signed into your Google Account and none of your browsing history is synced. Your Google searches, however, will still be synced with your Google account (unless you still pause Web & App Activity).
As such, the rest of this article is purely optional but I wanted to use the Firefox Multi-Account Containers extension and try take our privacy one step further by keeping our Google account completely separated from our daily browsing and general searches.
I don't use Facebook but that is another site that would be a perfect use case for a dedicated container. Google provides us with beneficial apps; Facebook is just plain creepy.
Create a Google Container
The Multi-Account Containers extension installs with a few blank containers already setup. We'll start by pruning this list.
Click on the extension's icon in the Firefox toolbar and then on Edit Containers at the bottom. You will now see the list of containers and next to each a pencil icon to edit and a trashcan icon to delete. Delete all of the containers you don't wish to keep (personally, I purge the entire list). Don't worry, there is a default container that you cannot edit or delete so it is safe to clear out the entire list.
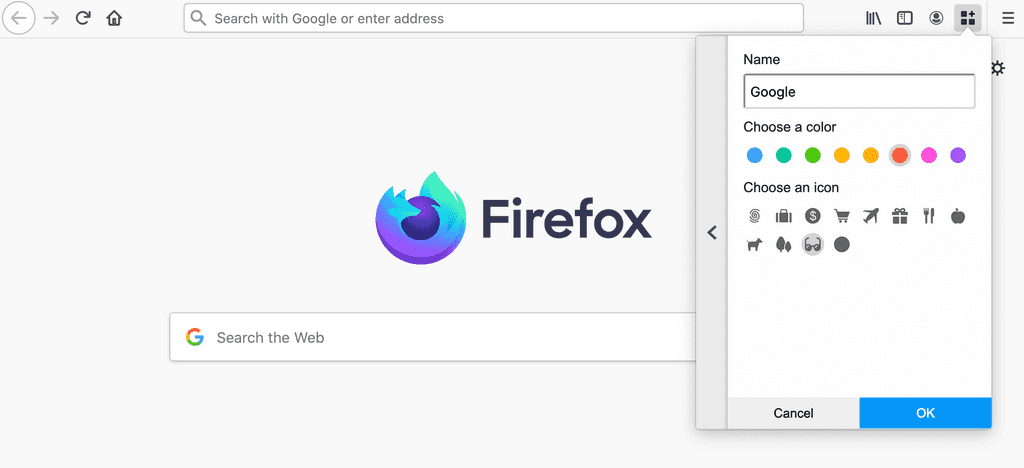
Exit Edit Mode and click on the + symbol to add our Google container.

I name it Google, select red for the colour and a pair of snooping glasses as the icon. Click OK to complete the creation.
Assign Google apps to the container
Any tab you open will automatically open in the Default container. We want to keep this default container completely disassociated from our Google Account so do not log into your account within any of the normal tabs.
To actually open a tab in the Google container you have to click on the extension icon and click on "Google" (the name of our newly created container). You should now see a new tab with a visible red underline to clearly show it is a tab in a special container. It is within this tab that you want to log into your Google account. Do not do so in your Default container (identified by no underline on the tab).
Once you have logged into your Google Account we are ready to assign the numerous web apps to favour opening in that segregated container. Start by going to a Google App you use often such as mail.google.com or keep.google.com. Once the app loads click on the multi-account extension icon again and you should see a checkbox that tells Firefox you prefer opening it in the assigned container.

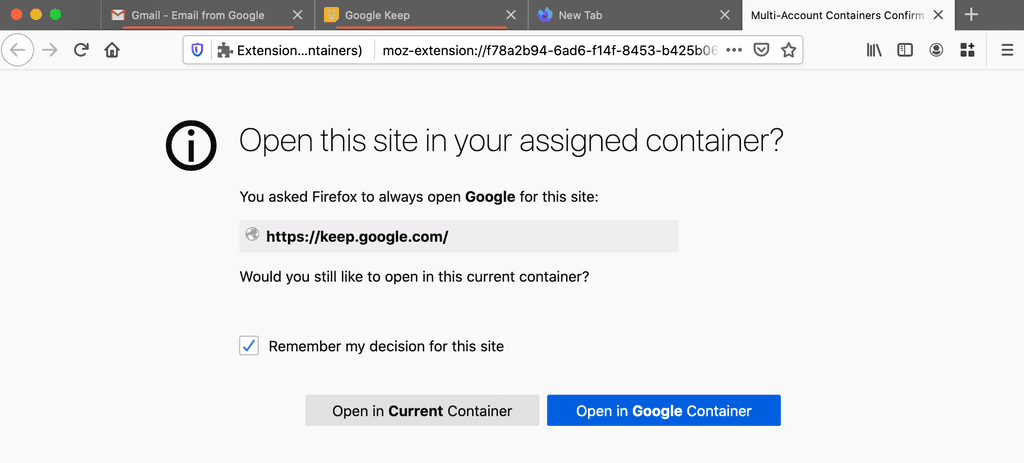
Now whenever you go to (for example) keep.google.com it will first ask if you want to open that web app in the preferred container (in this instance the Google container). You might like that Firefox always asks and there are some scenarios where that is preferred, but it would get pretty old pretty quickly if Firefox always asked you if you wanted to open mail.google.com in the Google container. Thankfully, we can tell Firefox to remember our decision and automatically open in the specified container without prompting us.

The one URL you should not add to automatically open inside of the Google container is www.google.com. This may seem counter-intuitive but if we set that domain to always use the Google container then any random search in the addressbar will open in the Google container. Since we're actually logged into our Google account in that container all of our search activity and history will still end up associated with our account.
Instead only register Google apps with the Google container.
My personal preferences:
- mail.google.com
- calendar.google.com
- drive.google.com
- photos.google.com
- keep.google.com
- myaccount.google.com
- youtube.com
Once you have completed setting up your Google container you are free to do any Google searches in a new tab since it will be in the Default container - the one where we are not logged into our Google Account. Any searches you do from within a Google container tab will still be associated with your account.
Conclusion
My switch to Firefox has been very successful and I have enjoyed using it the last few months - especially the Developer Edition! If you have any tips of your own or ideas on how the settings can be further improved then please leave a comment below.
